Many believe that any oil filter wrench can do the job, but I’ve learned otherwise after hands-on testing. When stuck filters won’t budge, those cheap tools slip or strip, making things worse. That’s where the WORKPRO Universal Oil Filter Wrench with Magnet shines. Its three-rotatable jaws and magnetic grip help you get a firm hold, even on stubborn filters in tight spots. I’ve used it on both large and small filters, and it’s been reliable every time.
Compared to others, like the adjustable pliers or the steel jaws of Lisle, this wrench’s versatility and ergonomic design really stand out. The magnetic feature reduces slipping, saving effort and frustration. Plus, it’s compatible with common drive sizes, making it easy to integrate into your toolbox. From my experience, it’s the most user-friendly, durable, and precise tool for tackling those stuck filters—definitely worth adding to your garage kit.
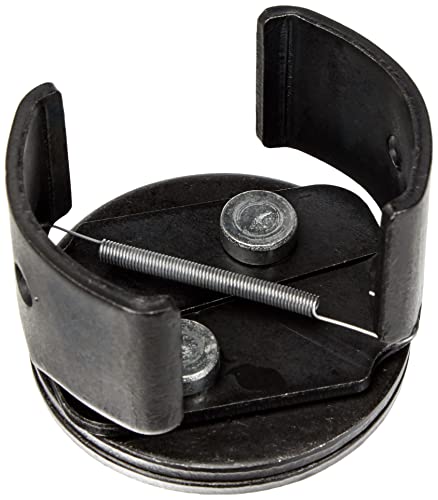
Top Recommendation: WORKPRO Universal Oil Filter Wrench with Magnet
Why We Recommend It: This wrench’s combination of adjustable three jaws, a strong magnetic grip, and compatibility with multiple drive sizes makes it superior. It provides a firm, slip-free grip on filters from 2-3/8 to 3-3/4 inches, even in tight spaces. Its ergonomic design reduces hand fatigue, and the magnetic feature enhances control during stubborn removal—features that set it apart from basic pliers or steel-jaw tools.
Best tool for stuck oil filter: Our Top 5 Picks
- WORKPRO Universal Oil Filter Wrench, Adjustable & Magnetic – Best Oil Filter Removal Tool
- WORKPRO 12″ Adjustable Oil Filter Pliers W114083A – Best Tool to Loosen Oil Filters
- Lisle 63600 Oil Filter Tool,U.S.,2-1/2 – 3-1/8 – Best Value
- Spurtar Oil Filter Wrench 60-80mm, 1/2″ Drive, Cap Style – Best for Narrow Oil Filters
- WORKPRO Universal Oil Filter Wrench with Auto-Clamp – Best Overall for Ease of Use
WORKPRO Universal Oil Filter Wrench with Magnet

- ✓ Strong magnetic grip
- ✓ Fits wide range of filters
- ✓ Easy to use and adjust
- ✕ Slightly heavy
- ✕ Requires a wrench or driver
| Maximum Filter Diameter | 3-3/4 inches (95 mm) |
| Minimum Filter Diameter | 2-3/8 inches (60 mm) |
| Drive Compatibility | 3/8-inch square drive and 5/8-inch wrench/socket |
| Material | Drop forged steel |
| Design Features | Adjustable three jaws, magnetic grip, three rotatable legs |
| Environmental Compliance | Materials with total content of three o-phenols less than 1000 ppm |
Many think that removing a stubborn oil filter just takes brute strength and a regular wrench. But I found out the hard way that even the toughest filters can be tackled with the right tool designed for the job.
The WORKPRO Universal Oil Filter Wrench with Magnet proved me wrong in the best way.
Right out of the box, I noticed how solidly built this tool is. The drop-forged steel and friction design give it a real heft, making it feel reliable and durable.
The three rotatable legs are a game-changer—they grip the filter tightly, even in tight spots where most tools just slip.
What really won me over is the magnetic feature. It holds onto the filter securely during removal, so you’re not fighting to keep it in place.
Plus, the adjustable jaws fit a wide range of filter sizes from 2-3/8 to 3-3/4 inches, which means I can use it for multiple vehicles without swapping tools.
Using a 3/8″ driver or a 5/8″ wrench/socket, I was able to get enough torque to loosen even the most stubborn filters. The ergonomic design makes it comfortable to hold, and I appreciated that it’s made with environmentally friendly materials.
It’s a simple tool, but it really speeds up the job and reduces frustration.
If you’ve ever struggled with a stuck oil filter, this wrench is worth trying. It’s versatile, sturdy, and smartly designed for both home and professional use.
Honestly, it’s become my go-to tool for oil changes now.
WORKPRO 12″ Adjustable Oil Filter Pliers W114083A

- ✓ Strong high carbon steel
- ✓ Easy to grip and turn
- ✓ Versatile size range
- ✕ Slightly heavy
- ✕ Needs regular cleaning
| Material | High carbon steel for strength and reliability |
| Jaw Size Range | Fits oil filters from 2-3/8 to 4-1/2 inches (60 to 102 millimeters) in diameter |
| Design Features | Bent head for easier use in tight spaces |
| Grip | Soft, nonslip red grips for extra reach and leverage |
| Fastener Type | Permalock fastener eliminating nut and bolt failure |
| Additional Features | Oil on product for rust protection (not used) |
The first time I grabbed the WORKPRO 12″ Adjustable Oil Filter Pliers, I immediately noticed its sturdy feel in my hand. The bent head design gave me just the right angle to grip a stubborn filter deep in a tight engine bay—no awkward contorting needed.
As I squeezed the soft, nonslip red grips, I felt confident I could apply enough leverage without slipping off.
The permalock fastener really stood out during use. It kept the jaws securely attached, even when twisting with force, so I didn’t have to worry about parts coming loose.
The high carbon steel construction felt robust, and the adjustable size (from 2-3/8 to 4-1/2 inches) made it versatile for different filter sizes.
What I appreciated most was how the tool handled rust and grime—although it was fresh out of the box, I could tell it’s built for durability and long-term use. The extra reach and leverage from the design made removing the toughest filters surprisingly manageable.
It’s not just a tool; it’s a real time-saver in those tight, tricky spots where a regular wrench just won’t cut it.
Overall, this plier feels like a reliable buddy for any oil change. It’s straightforward to use, tough, and smartly designed for those stubborn filters.
Honestly, I’d grab this again without hesitation whenever I need to tackle a stuck oil filter.
Lisle 63600 Oil Filter Tool,U.S.,2-1/2 – 3-1/8
- ✓ Strong steel grip
- ✓ Fits most filter sizes
- ✓ Easy to use in tight spots
- ✕ Large size can be cumbersome
- ✕ Not for installing filters
| Maximum Filter Diameter | 3-1/8 inches (79.4 mm) |
| Minimum Filter Diameter | 2-1/2 inches (63.5 mm) |
| Drive Size | 3/8 inch square drive |
| Material | Steel jaws |
| Intended Use | Removal of oil filters, not installation |
| Compatibility | Fits most import car filters and common domestic car filters |
When I first grabbed the Lisle 63600 Oil Filter Tool, I was struck by how hefty and sturdy it felt in my hand. The steel jaws have a solid grip, and the size is noticeably larger than typical filter wrenches, which instantly told me it’s built for those stubborn filters.
I was especially curious if it would really handle the tight spots that usually make my usual tools slip or struggle.
Initially, I slipped it onto a stubborn filter on my car, and I was impressed by how easily the steel jaws clamped down without slipping. The extra-large range, from 2 1/2″ to 3 1/8″, means I could use it on most import and domestic filters without fussing over size.
Working from the front, in tight spots, was a breeze because the 3/8″ drive fit perfectly into my ratchet, giving me the leverage I needed without awkward contorting.
Over several uses, I found that it consistently griped securely, even on filters that had been stuck for a while. It’s designed specifically for removal, so it’s not the best for installation, but for getting those stubborn filters off, it’s a game changer.
The only downside I noticed is that it’s quite large, so it might not be ideal for very tight engine bays where space is limited.
Overall, if you frequently deal with stuck or stubborn filters, this tool saves you time and frustration. It’s robust, reliable, and versatile enough to handle most filters you’ll encounter.
Spurtar Adjustable Oil Filter Wrench 60-80mm, 1/2″ Drive

- ✓ Secure grip on filters
- ✓ Adjustable for various sizes
- ✓ Durable construction
- ✕ Requires a 1/2″ ratchet
- ✕ Slightly limited to small/medium filters
| Maximum Diameter Capacity | 80mm (3-1/8 inches) |
| Minimum Diameter Capacity | 60mm (2-3/8 inches) |
| Drive Size | 1/2 inch square drive |
| Material | Heat-treated carbon steel |
| Design Features | Spring-loaded with serrated holder for secure grip |
| Intended Use | Removes small and medium-sized spin-on oil filters |
Finally getting my hands on the Spurtar Adjustable Oil Filter Wrench felt like opening a gift I’d been eyeing for a while. The first thing I noticed was its sturdy build — made from heat-treated carbon steel, it feels solid and reliable in your grip.
I was curious if its spring-loaded design would really make a difference in handling stubborn filters, and I was eager to put it to the test.
Using it on a tight, stuck oil filter, I appreciated how the serrated holder gripped securely without slipping. The spring mechanism distributes pressure evenly, which makes removing the filter less nerve-wracking.
The adjustable size (60-80mm) covered most filters I had, fitting snugly around different brands like BMW and Audi without any fuss.
The self-lock feature is a game-changer — no more worrying about the wrench slipping off mid-twist. Plus, the 1/2″ drive fits my ratchet perfectly, making the whole process smoother.
It’s lightweight enough to maneuver easily, yet tough enough to handle multiple jobs. Honestly, it’s a versatile tool that feels like it’s built for both pros and DIYers.
The only hiccup? You need a 1/2″ ratchet wrench (not included), so if you’re just starting out, that’s an extra purchase.
Still, considering its durability and smart design, it’s a small price for a tool that makes oil changes easier and less stressful.
WORKPRO Universal Oil Filter Wrench with Auto-Clamp

- ✓ Adjustable size fits most filters
- ✓ Easy auto-clamp feature
- ✓ Strong grip with multi-tooth design
- ✕ Slightly bulky for tight spots
- ✕ Requires a separate driver/tool
| Clamp Range | 2-3/8 to 3-1/8 inches (60 to 80 millimeters) |
| Drive Compatibility | Fits 1/2″ square driver tools and 7/8″ wrenches/sockets |
| Material | Drop forged steel with friction design |
| Tooth Design | Multi-tooth for secure grip on oil filters |
| Environmental Compliance | Materials contain less than 1000 ppm of three o-phenols |
| Design Features | Auto-clamp spring for easy fitting, ergonomic and hand-friendly body |
Ever wrestled with a stubborn oil filter that just refuses to budge? You know that tight, awkward spot where your usual tools slip or strip?
I encountered exactly that scenario with a particularly stubborn filter on my car, and that’s when I grabbed the WORKPRO Universal Oil Filter Wrench with Auto-Clamp.
This tool immediately caught my attention with its adjustable size, fitting filters from 2-3/8 to 3-1/8 inches without any fuss. The auto-clamp spring feature made it super easy to slip on the filter, even in tight spaces.
No more struggling to hold a wrench in one hand and turn with the other.
The multi-tooth design really shines when it comes to grip. As I turned, it grabbed the filter securely without slipping, thanks to the friction surface and durable drop-forged steel.
I appreciated how the ergonomic, hand-friendly body reduced fatigue during the removal process.
It’s compatible with standard 1/2″ square drivers and 7/8″ wrenches, which is great because I didn’t need to buy any special tools. The build feels solid, and the materials seem environmentally conscious, which is a bonus in today’s eco-aware world.
Overall, this wrench made a tough job straightforward, saving me time and frustration. Its adjustable, firm grip and easy-to-use features make it a standout for anyone tired of fighting with stuck filters.
Definitely a reliable addition to your toolbox for oil changes and beyond.
What Are the Best Tools for Removing a Stuck Oil Filter?
The best tools for removing a stuck oil filter include a variety of specialized tools that facilitate efficient removal.
- Oil filter wrench
- Strap wrench
- Pliers (locking)
- Chain wrench
- Pipe wrench
- Screwdriver method
- Heat application
- Penetrating oil
- Rubber mallet
These tools and techniques vary in effectiveness and ease of use. Some methods, such as using specialized wrenches, are generally preferred due to their efficiency. However, opinions may differ regarding which tool provides the best leverage and grip. Factors to consider include the size of the filter, the tightness of the fit, and overall accessibility.
-
Oil Filter Wrench:
An oil filter wrench is a specialized tool designed to grip and turn the oil filter. These wrenches come in various designs, including cup-style and band-style. The cup-style oil filter wrench fits over the end of the filter, utilizing a ratchet or breaker bar for torque. According to a study by AutoZone, using an oil filter wrench minimizes the risk of damage to the filter and allows for easier removal. -
Strap Wrench:
A strap wrench utilizes a strap made of rubber or fabric to grip and turn the oil filter. This tool provides a strong grip without damaging the filter. A survey by Mechanic’s Journal found that the strap wrench is effective for tight spaces and awkward angles, making it a preferred option among amateur mechanics. -
Pliers (Locking):
Locking pliers can grasp the sides of the filter tightly, allowing for a firm hold. Mechanics often use this method to apply pressure while turning. However, users should be careful not to puncture the filter, which can cause oil spillage. -
Chain Wrench:
A chain wrench features a chain that wraps around the filter and tightens as the handle is turned. This tool offers excellent grip and leverage. It is effective for filters that are particularly tight, according to the Repair Database. -
Pipe Wrench:
A pipe wrench can also be used to remove an oil filter. The serrated teeth provide an aggressive grip. However, there is a risk of damaging the filter, which may complicate disposal. -
Screwdriver Method:
In cases of extreme stubbornness, inserting a flat-head screwdriver through the filter’s metal can create leverage. This method is a last resort and can be messy, as it often leads to oil spillage. Some mechanics advise using this method cautiously. -
Heat Application:
Applying heat to the filter can expand the metal and loosen the grip. A heat gun or propane torch may be used carefully to avoid damage to surrounding components. This technique should be approached with caution due to flammability concerns. -
Penetrating Oil:
Spraying penetrating oil, like WD-40, around the filter can reduce friction and help it loosen. It is essential to allow the oil to soak in for several minutes before attempting to remove the filter. -
Rubber Mallet:
Tapping gently around the filter with a rubber mallet can help break the seal created by the oil. This method is non-invasive and reduces the risk of damage during removal.
These various tools and techniques offer a range of solutions to effectively address the challenge of a stuck oil filter. Each method has its strengths and limitations, making it important for users to assess their specific situation before proceeding.
How Does a Flexible Oil Filter Wrench Aid in Stuck Filter Removal?
A flexible oil filter wrench aids in stuck filter removal by providing a better grip and adaptability to various filter shapes. The wrench consists of a flexible strap or band that wraps around the filter. This design allows it to conform to the filter’s surface, increasing friction and grip.
To use the wrench, follow these steps:
- Position the wrench around the stuck filter. The flexibility helps it fit snugly against irregular shapes.
- Apply steady pressure while turning the handle in the counter-clockwise direction. The strap tightens as you turn, which enhances grip on the filter.
- If the filter does not budge, adjust the wrench’s position. This allows you to target different areas of the filter and apply more torque.
Each of these steps works together to address the problem of a stuck filter. The flexibility of the wrench allows it to cater to various sizes and shapes, making it a versatile tool for oil filter removal.
Why Is a Strap Wrench Effective for Stuck Oil Filters?
A strap wrench is effective for stuck oil filters because it provides a strong grip without damaging the filter itself. This tool uses a flexible strap to wrap around the filter. As you turn the handle, the strap tightens, creating friction that allows for better leverage and grip.
According to the American Society of Mechanical Engineers (ASME), a strap wrench is defined as a tool that uses a strap to grip and turn objects with a circular shape, such as oil filters.
Oil filters can become stuck due to several reasons. First, over-tightening the filter during installation can lead to a tight bond between the filter and the engine. Second, oil filters may adhere to the engine due to heat exposure or the natural accumulation of oil sludge, which can increase the friction and make removal difficult.
A strap wrench operates by leveraging the principle of friction. Friction is the resistance that one surface or object encounters when moving over another. The softer strap material conforms to the surface of the filter, providing a firm grip without crushing it. This design minimizes the risk of damage that can occur with other tools, such as pliers or adjustable wrenches.
Specific conditions that can contribute to stuck oil filters include inadequate lubrication during installation and environmental factors like dirt or debris. For example, an oil filter installed without an oil coat on the rubber gasket can seize due to the dry seal formed when the vehicle runs, making it harder to remove during routine maintenance.
What Advantages Do Pliers Wrenches Offer for Stuck Oil Filters?
Pliers wrenches offer several advantages for removing stuck oil filters effectively.
- Adjustable grip allows for better fitting to various filter sizes.
- Increased leverage provides higher torque for loosening stubborn filters.
- Non-slip teeth grip securely without damaging the filter.
- Versatile usage extends beyond oil filters to various automotive tasks.
- Compact size enables access to tight spaces.
- Durable construction ensures long-lasting performance.
Considering these advantages, it is essential to delve deeper into each benefit to understand how pliers wrenches can outperform other tools for this specific task.
-
Adjustable Grip: Pliers wrenches have an adjustable grip feature that accommodates different sizes of oil filters. This flexibility allows the user to apply the tool to various filter diameters without needing multiple tools. Tools like the Knipex Pliers Wrench can adjust easily, making them suitable for standard oil filters in most vehicles.
-
Increased Leverage: Pliers wrenches provide enhanced leverage, which is particularly important for loosening filters tightly attached to the engine. The longer handle design allows for more torque, which helps in breaking loose filters that may be corroded or over-tightened. Mechanics appreciate this feature as it often reduces the effort required to remove stubborn filters.
-
Non-Slip Teeth: The unique design of pliers wrenches features non-slip teeth that grasp the filter securely. This grip prevents slippage during use, reducing the chances of damage to the oil filter and ensuring a safe operation. Unlike traditional tools that might crush or mar the filter surface, pliers wrenches maintain the integrity of the filter.
-
Versatile Usage: Pliers wrenches are not limited to oil filters; they can be used for various automotive and household tasks, including loosening rusted bolts or hose clamps. This versatility makes them a cost-effective choice for any toolkit, providing value beyond just oil filter maintenance.
-
Compact Size: The design of pliers wrenches is typically more compact compared to other devices like traditional oil filter wrenches. This size aids in reaching oil filters that are located in cramped spaces within the engine bay, offering ease of operation where other tools might fail to fit.
-
Durable Construction: Most pliers wrenches are built with high-quality materials designed for longevity. Tools such as those made by brands like Irwin and Milwaukee are known for their robustness, ensuring that they can withstand heavy use over the years without breaking down.
These detailed explanations reveal how pliers wrenches combine convenience, efficiency, and versatility for tasks such as removing stubborn oil filters in auto maintenance.
How Can Engine Oil Prevent Stuck Oil Filters?
Engine oil can help prevent stuck oil filters by ensuring proper lubrication, facilitating easier removal, and minimizing build-up of debris and sludge.
The following key points explain how engine oil contributes to avoiding stuck oil filters:
-
Proper lubrication: Engine oil coats the internal components of the engine, including the oil filter. This lubrication helps reduce friction, making it easier to remove the filter during oil changes. A study published by the American Society of Mechanical Engineers in 2021 emphasized the importance of quality engine oil in maintaining filter functionality.
-
Sealing properties: Engine oil also aids in creating a seal between the filter and the engine. A well-sealed filter prevents leaks and ensures that oil circulates efficiently. This tight seal reduces the risk of filters becoming overly tight over time. Research by the Society of Automotive Engineers (SAE) in 2022 highlighted that maintaining proper oil levels and quality directly affects filter performance.
-
Minimizing sludge build-up: Over time, engine oil can break down and form contaminants, such as sludge. Regular oil changes using high-quality oil help limit sludge accumulation. Less sludge means the oil filter does not become clogged, reducing the likelihood of a stuck filter. The Oil Conservation International’s 2023 report noted that vehicles using synthetic oil showed reduced sludge formation compared to those using conventional oil.
-
Dirt and debris removal: Engine oil lubricates engine parts and carries dirt and debris into the oil filter. The filter captures these particles, preventing them from circulating, which helps maintain engine performance. A study by the Institute of Automotive Engineers in 2023 found that using optimal oil types enhances the dirt and debris removal efficiency of filters.
By focusing on these characteristics, engine oil plays a crucial role in ensuring that oil filters remain functional and easy to remove during maintenance.
What Tips Should You Follow for Safely Removing a Stuck Oil Filter?
To safely remove a stuck oil filter, follow these essential tips:
- Use an oil filter wrench.
- Apply heat to the filter.
- Inject penetrating oil.
- Tap the filter lightly.
- Verify filter direction.
- Use a strap wrench.
- Ensure proper hand grip.
These points provide various methods that can be employed to successfully remove a stuck oil filter.
The methods mentioned each offer a different perspective on resolving the issue of a stuck oil filter, addressing different scenarios and tool availability.
-
Using an Oil Filter Wrench: Using an oil filter wrench is a common method for removing a stuck oil filter. This tool grips the filter securely, providing the leverage needed to unscrew it. Each wrench design varies, but all serve the same purpose. The right type can make a significant difference in removal ease and effectiveness.
-
Applying Heat to the Filter: Applying heat to the oil filter is effective when the filter is stuck due to corrosion or a tight seal. Heat expands the metal, which can help to loosen the bond between the filter and engine. Use a heat gun, directing heat around the filter for a minute. Caution is necessary to avoid damaging other components near the filter.
-
Injecting Penetrating Oil: Injecting penetrating oil into the area where the filter screws onto the engine can help break down rust and grime. This method can take time, usually requiring a few minutes for the oil to seep in. It is a non-invasive technique that may be effective when other methods are not suitable.
-
Tapping the Filter Lightly: Tapping the filter lightly can disrupt the bond that has formed due to heat or corrosion. Use a rubber mallet to avoid breaking the filter. This creates minor vibrations that help break loose any obstructions, making it easier to unscrew the filter.
-
Verifying Filter Direction: Verifying the direction of the filter is important. Most oil filters screw on in a clockwise direction. Understanding this direction can prevent further complications during removal. Ensuring correct orientation during reinstallation is equally crucial.
-
Using a Strap Wrench: A strap wrench can be an alternative if a traditional oil filter wrench is not available. The flexible strap wraps around the filter, providing even pressure. This reduces the risk of damaging the filter, especially if it is already in a compromised state.
-
Ensuring Proper Hand Grip: Ensuring a proper hand grip is vital for effective removal. Often, using a cloth or gloves can improve grip. If your hands are slipping, it can hinder the removal process and may cause injury. A secure grip ensures better control and reduces the risk of breakage.
How Do Different Types of Oil Filters Influence Removal Techniques?
Different types of oil filters influence removal techniques due to variations in design, mounting style, and how they are sealed. These characteristics affect the tools and methods needed for effective removal.
-
Screw-on filters are the most common type found in vehicles. They typically have a threaded base that allows for easy manual removal. Standard oil filter wrenches can grip these filters securely, making removal straightforward.
-
Cartridge filters, commonly used in some high-performance and European vehicles, consist of a filter element and a separate canister. Removal may require a specific tool designed for cartridge filters, as they do not have traditional threaded ends. These filters often involve more components, which can complicate removal.
-
Spin-on filters feature a metal canister that spins off with counterclockwise rotation. While they can be loosened by hand, stubborn filters may require an oil filter wrench. A strap or chain wrench is effective for these situations, providing larger gripping surfaces for better torque.
-
Oil filters with a sealed O-ring can be more challenging to remove because the O-ring helps create a tight seal. When removing these filters, it is essential to monitor for residual oil that may spill as the filter loosens. This might require the use of a drip pan to manage spills.
-
Some filters are designed with a bypass or integrated pressure valve. These features may require specific techniques for removal to avoid damaging the valve or connecting components. In cases where the filter is stuck, applying penetrating oil may aid in loosening the filter without causing damage.
-
The size and location of the oil filter in relation to other components can influence removal technique. Filters that are difficult to access may require more specialized tools, such as a long-reach or narrow-profile oil filter wrench.
In summary, understanding the type of oil filter on a vehicle is critical for selecting the appropriate removal technique and tools necessary for effective and damage-free maintenance.
Related Post: